
Experiments with an Arduino microcontroller
Projects using the NodeMCU Devkit with ESP8266 WiFi Module
About the NodeMCU
The NodeMCU is an arduino-like module, carrying an ESP8266/12 WiFi chip. The board includes a 3.3V regulator, does all the necessary level conversion to support the USB port, and has pins to make connection. The first thing to notice is the NodeMCU is larger than the nano or Micro Pro - it WONT fit on a mini breadboard! This one measures 58*32mm with 15 pins each side, on a 0.1 inch pin spacing & rows are 1.1 inch apart. There are a few different versions which have EITHER the SiLABS CP2102 or CH340 TTL-USB converter.
The ESP8266 is a microcontroller with an additional WiFi function, and considerable on-board storage (1M, 2M or 4M).
NodeMCU Pin Connections
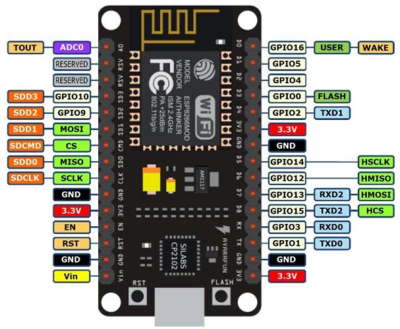
Like all Arduino type boards, the pin connections can have multiple functions. The NodeMCU has:
12 digital GPIO pins - but only D0 - D7 usable as conventional digital I/O
SPI, IIC, and 1-Wire communication
There is a single ADC - the 8266 measures 0-1V and this is scaled on the NodeMCU board to read 0 - 3.3V
Maintained supply
If your project needs a maintained supply (i.e. a backup battery) Adafruit sell the "HUZZAH feather" in both ESP8266 AND ESP32 forms. These have a built in circuit and connector to connect a LiPo polymer battery.
Programming the NodeMCU
I'm using a portable Arduino IDE to program the NodeMCU. You need to load the core for the ESP8266, as described here.
Open the preferences window from the Arduino IDE. Go to File > Preferences On the preferences window, locate the "Additional Board Manager URLs" text box, enter http://arduino.esp8266.com/stable/package_esp8266com_index.json into the field and click the OK button.
Next, go to Tools>Boards>Boards manager, enter "ESP" in the search field, and install the esp8266 core libraries.
To operate the WiFi I needed to install another library, using "Tools - Manage libraries"; the ESP8266Wifi library
When this is done you should see under "Tools - Board - Board manager" ESP8266 boards; I chose "NodeMCU 1.0"
NOTE: on some boards the program upload will fail unless you hold the reset button closed until compilation is complete and the upload begins, with the dots showing. Also some boards (eg the "Amica" ) require D8 connected to ground during programming.
Build a WiFi access point.
The NodeMCU / ESP8266 and ESP32 boards with on-board WiFI are able to be programmed to act as a WiFI access point.
WiFI access point?
Your router is a wifi access point. It creates a wifi network that other local devices can access.
You can do the same with a NODEMCU or ESP32 board. It will be a "soft access point" "SAP" with its own identifier "SSID" and password, but you will not be able to access the internet through it - just the SAP itself, and other devices "Stations" on that network.
Build a web client or server.
The NodeMCU / ESP8266 and ESP32 boards with on-board WiFI are ideal for making simple web stations. The I2C and SPI page shows how I made a simple web server to display readings from a pressure sensor on a remote PC via a browser.
What is a web (http) Client or server?
When you access a web page from your pc the browser acts as a web client. It makes a request to the remote site (server) which then sends back information.
Instead of accessing a web page, by pointing a browser at the right URL you can send a request to the "weather station" which (acting as a server) will then return a "web page" with the values from the sensor.
The tutorial referenced below shows how you can use a second NodeMCU to make a web client that will do the request automatically, and display the returned values on an OLED display (or LEDs or whatever)
References & more information
https://randomnerdtutorials.com/esp8266-nodemcu-client-server-wi-fi/