Cooling your computer
I'm often asked questions about how to keep the components in a computer cool. In particular the CPU and graphics chip (GPU) can use large amounts of power, producing heat, and this needs to be removed effectively or they will overheat and be destroyed. If your system is shutting down after being in use for a while, this could be the source of your problem.
To start you will need to identify what the source of the problem is by measuring temperatures while the computer is in use. You will also need to measure the room temperature with a thermometer.
To check the temperatures you need HWInfo and stress test programs eg - Prime95, HeavyLoad
Its best to monitor how your system behaves from cold. So its a good plan to run HWInfo when the PC starts up. Here's how to do that.
- In recent versions of Windows just press Win+R and in the run box type shell:startup Click OK and the startup folder will open.( On earlier versions click the Start button, click All Programs, right-click the Startup folder, and then click Open.)
- Open the location that contains the item you want to create a shortcut to.
- Right-click the item, and then click Create Shortcut. The new shortcut appears in the same location as the original item.
- Drag the shortcut into the Startup folder.
Once your PC has booted up you can check the voltages and temperatures shown by HWInfo; then immediately select the important sensors (enable logging so if your pc crashes you will still have the results.

Cooling a tower case
I found How To: Properly Plan And Pick Parts For An Air-Cooled PC, Part 1
which covers the main issues well and in good detail. If you havent done so already, read it now.
Then this one How To: Properly Plan And Pick Parts For An Air-Cooled PC, Part 2
Additional points include:
- matching intake and exhaust rates
- positive or negative pressure
- position of power supply
- obstruction to air flow
- warm air at intake & adding heat sinks
- dirt and dust on fans, heat sinks etc.
- maintenance of PCs and laptops
- power connectors for fans

Matching intake and exhaust rates
Suppose your tower case intake fan gets blocked. The exhaust fans will be trying to suck air out, and create a low pressure inside the case. Soon they will be unable to extract more air, and although they will continue to spin and make a noise, they will not move any air. Similarly, if the exhaust is blocked the pressure inside will rise a little, and again no air will move.
The ideal situation is that the intake and exhaust are matched, so that air pressure inside the case is just a little above the outside (positive pressure). This prevents air entering the case and bringing in dirt. In this condition the noise from the fans is minimised.
To achieve this you need to look at the airflow rate for each fan. A typical 120mm fan will transfer 20 - 80 cubic feet per minute if unobstructed - depending on the speed it runs at. Smaller fans will generally have a lower airflow rate.
Your power supply will not usually specify the airflow rate, so assume around -20cfm. depending on the power rating and fan size.
Thus if you have a case with a single 120mm intake fan (+60cfm), power supply (-20cfm) , and 2 * 80mm exhaust fans (2*-20cfm) your system is reasonably well balanced, with neutral pressure, and optimally quiet.

This "Gelid Silent 8" 80mm fan runs at 1600 rpm
with an airflow of 20 cfm and 18dBA noise
(not to scale)

This Glidestream 120mm fan runs at 1200 rpm
with an airflow of 66 cfm and 25dBA noise
(not to scale)
Positive pressure
Having a high pressure inside your case helps to push air out through graphics cards, vents, and extract fans. To achieve this you need intake fans that will work at higher static pressure. This is also true if you are pushing air out through a radiator (for water cooling), or drawing air in through a filter. If you wish to run at higher internal pressure you need intake fans that can work under these conditions.
High static pressure fans generally have more or larger blades so its harder for air to leak back through the fan. Compare this Corsair Air Series SP120 with the Glidestream fan above.

In this table you can compare the airflow and static pressure for two different case fans. (both are Corsair 120mm)
You can see that the "High performance" version provides almost double the airflow and higher static pressure, but is louder, runs at a higher speed, and consumes more power than the "quiet edition".
| SP120 High Performance Edition | SP120 Quiet Edition | |
| Airflow | 62.74 CFM | 37.85 CFM |
| Static Pressure | 3.1 mm/H20 | 1.29 mm/H20 |
| Sound Level | 35 dBA | 23 dBA |
| Speed | 2350 RPM | 1450 RPM |
| Power Draw | 0.18 A | 0.08 A |
Obstructed air flow - and vents!
Clearly the intake and exhaust points should not be blocked. However placing the case back against a wall, blocking a side-mounted fan etc. will prevent the ventilation from working effectively. For example a 120mm fan (which has an area of pi * 120 / 2 = 190mm^2) at the rear of the case (which is 200mm wide) will need an air gap of more than 20 mm (around an inch) to allow the air to escape freely.
To save calculation a good rule of thumb is the free air space should be no less than the fan diameter.
Scouring pad filter

Many cases have grilles or vents to allow fans to be fitted in multiple locations. A fan next to an open grille or vent will not produce the desired air flow. One solution is to block these vents. An alternative I often prefer is to cover the vent with scouring pad material like this. It allows some air to flow through should one fan fail, and also acts as a dust filter. You can even fit it over an intake fan if the PC is to be used in a dusty environment (in which case it should be cleaned regularly or it will clog).
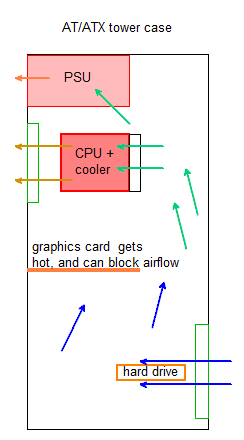
Cool air enters bottom front, getting warmer as it passes over the hard drive and graphics card or on-board graphics) then exits via the PSU and rear mounted exhaust fan.

Bottom - mounted intakes will require the case to be raised from the floor. Be aware they are the most prone to sucking in dirt. A bottom mounted PSU that sucks air in from the bottom of the case will need a filter so it can be kept clear of dust. A dirty filter will also reduce the airflow - often considerably!. Here the PSU is mounted at the bottom. Taking air from above will reduce the air flow to the graphics card; air from below may not be clean. A rear intake fan will suck in warm air - better add another front fan or side fan. A side intake fan is useful on high-end systems as it provides fresh cool air directly to the graphics card and cpu.
Warm air at intake - adding heat sinks
You should plan your cooling so that the exhaust air is kept separate from the intake air. Intake fans at the rear are often a bad idea as they will suck in warm exhaust air from the psu.
If the environment the computer is in gets hot you may need additional cooling or even extra heat sinks.
Components lose heat by transferring it to the surrounding air, at the surface. A simple solution to improve this process is to add a heat sink - a metal structure that is shaped to provide a large surface area in a small space.
For example you may find the hard drive becomes hot. Simply attaching a heat sink like this to the metal surface will reduce its temperature dramatically and improve reliability.
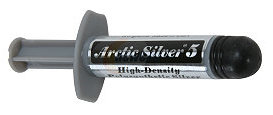
You need to ensure good contact. A tiny dab of superglue or epoxy resin adhesive in the centre will do the job well, especially if you apply dabs of heat transfer paste (or zinc oxide ointment) around the edges.

Dirt and dust
These can seriously reduce the cooling of your system in the following ways:
- blocking air spaces and vents - particularly in heat sinks
- coating (and insulating) components
- adhering to fan blades reducing efficiency and air flow
- causing contamination in bearings
Maintenance
Prevention is the best strategy here, with the following maintenance procedures:
- keep the area in which the PC is used clean and free from dust by regular vacuum cleaning and dusting.
- clean mesh filters regularly - every few days. Wipe outside of PC over with damp cloth.
- Remove side panel (every few months) and vacuum out or clean with "air duster". Dont touch any components. Clean filters, replace if necessary.
- Annually - disconnect PC; remove both side panels, vacuum out, wipe inside of case with damp cloth
Clean with fine brush and air duster to remove dirt from fan blades, cooling fins, RAM chips etc.
Carefully remove front panel and cleancase inside front panel and fan.
Check and replace fans: Connect up, power on, observe all fans working. Check for noise or stickiness and if any show signs of failure replace them. (Easy job)
Check all connections inside (especially SATA cables) are in place before reassembling. - LAPTOPS: The heat exchanger in your laptop has narrow airways that are easily clogged. Cleaning laptop airways, heat sinks and fans is a job for a specialist. Do your best to keep the area around it clean to avoid this.
Power connectors
PC fans are typically fitted with a small "Molex KK" type connector, which may have two, three or four wires. The purpose of these connections is shown below.
| pin no | wire colour | purpose |
| 1 | black | 0V |
| 2 | red | +12V |
| 3 | yellow | speed measurement |
| 4 | blue | speed control |
Motherboards typically provide a 4 pin header for the cpu fan and 3 pin headers for case fans. If there are not enough you can use adaptors to plug your fans into the 4 pin MOLEX or SATA connectors from your power supply, but will not then be able to control or measure the speed. However case fans normally run at constant speed so thats not a major issue.
A 3 pin fan can plug into a 4 pin header, and a 4 pin plug will fit on a 3 pin header; but then of course speed control will not be available.
Note: the color code for wires on large MOLEX connectors is NOT THE SAME as for the small "kk" molex connectors.

3 pin molex kk (fans)

4 pin molex (IDE drives)
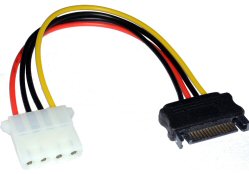
4-pin molex to SATA power