Upgrade to Windows 10
Many people have experienced problems with incomplete installation using the online upgrade. Here is a more reliable way to upgrade your Operating System (OS) from Windows 7 SP1, or 8.1 to Windows 10, using Microsoft's Media Creation Tool.
It's also a good way to carry out major upgrades, like the recent update to Windows 10 "Threshold 2".
Why use this tool?
Microsoft say "this tool provides the best download experience for customers running Windows 7, 8.1 and 10. The tool provides better download speeds, and the option to retain a copy of the download so you can reinstall later if you have a problem. It also means you can update all your suitable computers from a single download.
My two pennorth - the online upgrade does not offer you any control over the process. I'm MUCH happier working through the steps listed below. Its like baking a cake - You COULD just start with whatever you have, the go to the shops in the hope they will have ingredients you need to make a good cake. I prefer starting from the recipe, collecting the ingredients, making a shopping list for those I don't have, and only starting the baking process when I know everything is ready.
If you dont feel confident to follow these steps I'll be happy to do the upgrade for you.
Normally you will log in to Windows 10 using your Microsoft account identity and password. if you don't already have one you can use this link to create a Microsoft account. Please take note of the warning and disclaimer below.
Steps to carry out the upgrade: (more detail below)
- Back up your data
- Your existing Operating System should be fully updated before you start.
- Download and run "64 bit checker" to identify the current version of your OS.
- Change your computers power settings so it stays on. Check the settings in BIOS to make sure the PC boots from the hard drive, and not from CD/DVD nor USB.
- If you have an online upgrade icon you can click to check whether your hardware and installed apps will all run under windows 10. If not you can use "Windows 10 Wizard"
- From Microsoft's site download the correct version of the "media creation tool"
- Once the Tool has downloaded, run it and follow the on-screen prompts to download and install Windows 10.
More information
1: Back up your data
The upgrade process has a very small chance of corrupting your data. However, this is a good opportunity to make sure your valuable documents - photographs, music, correspondence etc - are kept safe. Use File Explorer to copy them onto a memory stick or CD/DVD.
DO NOT just copy them to another place on your existing hard drive.
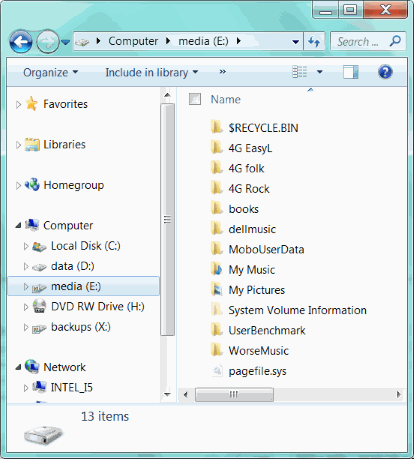
Simply open File Explorer, and right click on the folder you wish to back up. From the drop-down list, choose "Copy".
Navigate to a free area on another drive, perhaps a CD/DVD, a memory stick, or an external hard drive such as a WD "passport".
In this image you can see I could right click "My Pictures", then open my External hard drive called "backups(X:) and paste the folder there.
2: Update the current OS
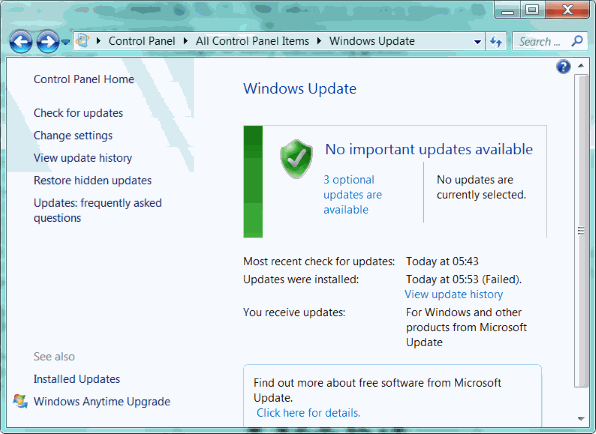
Normally your PC should carry out regular updates. However you should still open "Windows Update" in Control Panel, and ensure all updates have completed.
Here you can see my PC needs to restart to finish installing updates.
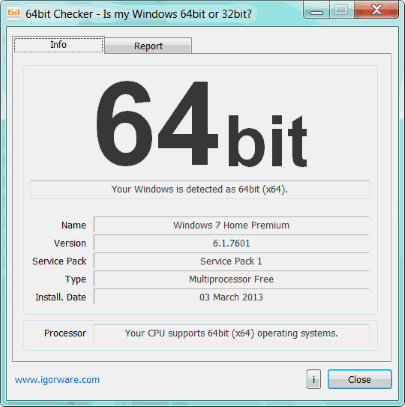
3: Identify OS as 32 or 64 bit
When you run 64 bit checker it will give a display like this showing you immediately what type of OS you have.
This will allow you to choose the correct version of Microsoft's Media Creation Tool.
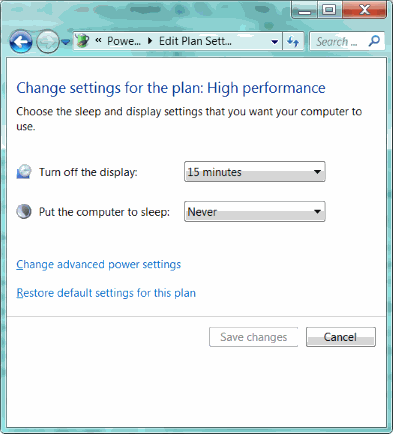
4: Keep it turned on
For the next two steps you will need to make sure your computer stays on. Laptops should be running from the mains.
Check your Power Options in Control Panel and change the settings so the computer does not go to sleep. You may also want to keep the display turned on but that is not so important.
After a power on reset enter the BIOS (usually by pressing DEL, ESC or F2 immediately the start screen is shown) and set the boot order so that the hard drive is the first to be chosen. Save & Exit (usually press F10).
5: Check compatibility from the upgrade icon or "Windows 10 Wizard"
6: Download the Media Creation Tool
Although intended primarily for creating a Windows installation DVD or USB stick, you can also use the Microsoft Media Creation Tool to upgrade Windows in place.
Make sure you download the right version for your PC - either the 32-bit version or the 64-bit version.
7: Run the Media Creation Tool
Once the download of the media creation tool is complete, run it and follow the on-screen prompts to install Windows 10.
It will download the correct version of Windows 10, then proceed to install it.
The download and installation will take a long time, so be prepared to wait. Mostly it completes without user intervention.
Alternatively you can choose to save the downloaded file as an ISO image, or create a USB drive directly.
That's it! You now have Windows 10.
I've written a page to help you get started and set up Windows 10 to suit your own individual needs.
Using the downloaded ISO file to upgrade Windows 10
First you need to create a bootable USB (or DVD). You will need a USB memory stick (ideally USB3) of 8G or more capacity.
Download and run RUFUS portable edition. The settings you will need depend on whether the computer has a LEGACY BIOS (pre 2012) or UEFI BIOS.
In either case you will choose the USB drive "Device" you wish to use; and also the location of the saved ISO file by clicking on the button next to "ISO Image"
Does my PC have a UEFI BIOS?
When you power up your computer you will see an option to enter SETUP. Depending on the manufacturer of your system, you can press the DEL key, the F2, F10, F12 key or another key that is listed on screen to access the system BIOS. If you are not sure, consult the User Guide that came with your computer or google for the information on that model.
Once in your system BIOS, look under the Boot menu to find an option that reads "UEFI/BIOS Boot Mode" or "UEFI Boot". If there is no such entry you have a conventional or "legacy" BIOS.
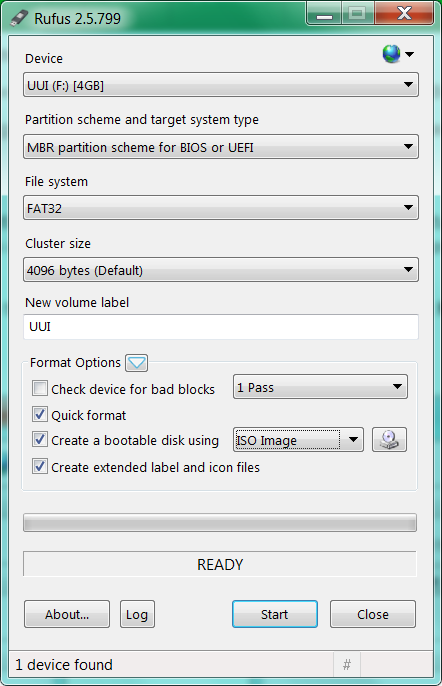
The dialog above shows the seettings you will need if your computer has a "Legacy" BIOS
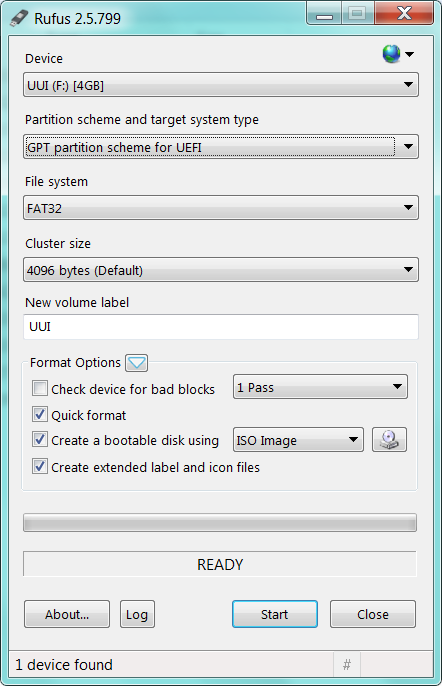
This shows the settings you will need to choose for a computer with a UEFI BIOS
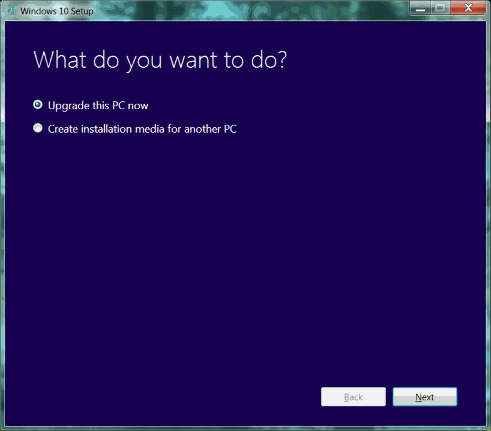
Installing or upgrading using the USB drive
When your USB drive has been successfully created you can use it to perform a new installation, or an upgrade. For a new installation, boot from the USB drive; for an upgrade you will need to start windows normally, and run "setup".
You will have the option to retain user files.
Assuming your upgrade completes successfully you will see some "reassuring" messages when you next start windows.
"All your files are exactly where you left them"
"We've got some new features to get excited about"
"We'll be ready soon" ... well, in a while.
When it starts up don't worry if it does'nt look quite right. Restart and all will be well (usually - mostly).
In some cases you will see this message:
"Windows can not be installed because the PC has an unsupported disk layout for uefi firmware"
This means the drive has an MBR type partition table. Newer PCs and larger drives use a GPT partition table. Windows 10 (presently) will not install on an MBR drive if the BIOS is UEFI. The simple solution (although not ideal) is to change the BIOS to disable UEFI.
Important warning: Your Microsoft Account
By default you will log in to your PC using your Microsoft account as username and pasword. This means you will not need to log on seperately for Onedrive, Email or other applications. If you don't already have a Microsoft account you will be offered a chance to get one when W10 installs. If you prefer, you can sign up for a Microsoft account here. However..
Recovering a lost Microsoft Account can be VERY difficult - or even impossible.
Your details are protected VERY securely. So do make sure you keep a record of the EXACT username (email address) and password that you use for that account. Write it down, make sure its clear which are numbers, letters, upper & lower case etc. and keep a copy with you.
If you lose access to your Microsoft account it could make your computer unusable, and there may be no way to access your files - documents, music, photos, etc..
Disclaimer
skillbank.co.uk provides this information in good faith as a free service. We make no representations or warranties of any kind, express or implied, about the completeness, accuracy, reliability, or suitability of the information contained on the website for any purpose. Any reliance you place on such information is therefore strictly at your own risk.
In no event will we be liable for any loss or damage including without limitation, indirect or consequential loss or damage, or any loss or damage whatsoever arising from loss of data or profits arising out of, or in connection with, the use of this website.